 Its been nearly 4 months since this blog has been active. Its been a crazy summer. Work has been overwhelming, wedding planning is starting to occupy most of our time and I guess life just too busy the for interweb sometimes. That being said, we do still eat dinner nightly, Kelley Bean has recently taken up knitting, the Fall sports season starts this week and we've been doing lots of crafts in preparation for the wedding, so we have a ton to catch up on here. Let's see how we do.
Showing posts with label Craft. Show all posts
Showing posts with label Craft. Show all posts
Monday, August 17, 2009
Back to blogging. Hopefully...
Its been nearly 4 months since this blog has been active. Its been a crazy summer. Work has been overwhelming, wedding planning is starting to occupy most of our time and I guess life just too busy the for interweb sometimes. That being said, we do still eat dinner nightly, Kelley Bean has recently taken up knitting, the Fall sports season starts this week and we've been doing lots of crafts in preparation for the wedding, so we have a ton to catch up on here. Let's see how we do.

Monday, July 13, 2009
Wednesday, April 22, 2009
Simple String and Moss Vases

Materials You'll Need:
- Mason jars (any size)
- Crochet thread
- Moss
- Flowers
- Scissors
Directions:
1. Take a piece of moss and place it on the outside of the jar. While holding it with your finger, wrap the thread around the moss several times until the moss is secure.
2. Add another piece of moss and continue wrapping the same thread around the jar. Repeat until jar is fully covered.
3. Wrap the thread around the jar several times, pulling tightly while working your way up and down the sides of the jar. Tie off with a knot.
3. Use scissors to trim excess moss around the edges of the jar.
4. Fill with water and flowers!
This DIY project was originally found at Once Wed. There, they used tin cans (which may work better due to the flat bottom) and actually planted bulbs in the vases.
Regardless of which directions you choose to follow, this is a unique and budget-friendly decoration perfect for your home or special occasion. I recently made these as gifts for friends who came over for Easter brunch. They were a hit!
Monday, April 20, 2009
"You Got Queered, Doe" Tee

 Yet another stencil t-shirt. This one was made for Stephen who coined the now famous "You got queered, doe".
Instructions on how to make these can be found on the "Don't Exist" post.
Holla.
Friday, April 3, 2009
Minnesota State Capitol Collection
We recently purchased a new 10-20mm wide-angle lens and wanted to take pictures of something big, so we wandered down Rice Street to the State Capitol to take a little self guided tour. Its pretty neat inside. If you haven't been there, I highly suggest it!
 Quadriga's Domicile
 Inner Rotunda
 Stately Passage
 Rotunda's Edge
 Quadriga's Domicile
 Inner Rotunda
 Stately Passage
 Rotunda's Edge
Gilbert's Vision
Friday, March 27, 2009
Recycling DVD Spindles
 Don't you hate plastics that can't be recycled? Why are they even used nowadays? Dean Bean goes through these DVD/CD spindles at work constantly. After letting them pile up and not wanted to throw them away, we thought, why buy more glass dry good containers when we can simply hack off the spindle of these, flip them up-side down and voila! So far so good.
I have 100's of these if you want any...
Thursday, January 29, 2009
Miss Frances McNattin's NorthEnder Onesie
 This little number was made for our fellow NorthEnder's darling little girl, Frances. It's another freezer paper stencil with an acrylic paint and fabric medium mixture. Instructions on freezer paper stencils can be found here.
Sunday, January 25, 2009
Adelaide's Onesie
 This one was made for Kelley Bean's workmate, Erin. Erin gave this to her friend's new little girl, Adelaide. Dugan and Chauncey are the family pets. This is a simple dark shirt iron on.
Tuesday, January 13, 2009
Manuary

- Step 1- Decide to grow a beard.
- Step 2- Do nothing
- Step 3- Repeat step 2 as long as necessary.
Thursday, January 1, 2009
Happy New Year!
Wednesday, November 12, 2008
Onesies for Baby George
 These onesies were made for the soon to be born George W. Johnson, IV. Both images were simply taken from the interweb, photoshopped slightly, and printed on iron-on transfer paper with an at home ink-jet printer.
Congratulations, Leigh and George!
Monday, August 11, 2008
The Beans Tee No. 2
 This is the second in the series of, "The Beans" t-shirts to be made. Instructions on how to make this can be found on the "Don't Exist" post.
Monday, August 4, 2008
Tuesday, July 29, 2008
The Beans Tee No.1
 This is the first of a few, "The Beans" t-shirts to be made. It was made with an inverted stencil to give it a little more than usual, home-made feel. Instructions on how to make this can be found on the "Don't Exist" post.
Friday, July 25, 2008
"Don't Exist" T-Shirt

Our friend Emily is obsessed with the band, Beirut (she saw them 3-4 times in one week). While trolling Youtube for videos of her obsession, she watches a video that has a guy in the background is wearing a shirt that says "I Listen To Bands That Don't Even Exist Yet". Emily, as anyone would, thinks this is very clever and immediately makes this her Facebook status. I inquire, get this story and decide instantly that I need to make this shirt for her.
Shortly after putting this design together, it dawned on me to google it, as it obviously already exists, and found this design by Evan Ferstenfeld AKA FRICKINAWESOME. Sorry, Evan, I like mine better...
Materials Needed:
- Stencil Design
- Printer (Not Necessary)
- Freezer Paper
- T-Shirt
- Fabric Paint
- Foam Paint Brush
- Exacto Knife
- Iron
Instructions:
- If you've designed your stencil on a computer, you can try to print the image directly on a piece freezer, shiny side down, cut to 8.5 x 11. I was unable to get the freezer paper to feed through a printer, so I printed it on regular paper and traced the design on to the freezer paper.

- Next, cut out your stencil using an exacto knife over a cutting mat.

- Then iron your stencil on to the t-shirt. Make sure the shirt has been washed and is wrinkle free beforehand. Make sure your iron is set to the dry setting, go over the stencil once and wait for it to cool. Once it's cooled, go over it a second time and make sure all of your corners and edges are ironed down. Then iron a blank second piece of freezer paper on the opposite inside of the t-shirt to prevent bleed through when actually printing.

- Next you'll actually paint your shirt. Fabric paint can be found, but I used acrylic paint mixed with a fabric medium. Dab the paint on with a foam brush. Make your first coat fairly thin and wait for it to dry. Once it's dried you can paint on additional layers until you feel you have enough. Two should be enough.

- When the shirt has completely dried, carefully peel off the freezer paper. Lastly, you'll need to dry the t-shirt, inside out on low heat in order to heat set the paint.


Have fun!
Wednesday, July 9, 2008
The Sparkle Boom Collection
On our recent trip to the Motherland over the Independence Day weekend, we spent the 4th of July evening in Winneconne (Omro's fireworks were canceled due the recent flooding of Fox River) where we played around shooting fireworks with a long exposure. We hope you enjoy!
 All I Need is a Miracle
 Electric Dandelion
 Twilight's Last Gleaming
 Died For Your Sins
 Optic Nerve Ending
 Starry, Starry Night
 All I Need is a Miracle
 Electric Dandelion
 Twilight's Last Gleaming
 Died For Your Sins
 Optic Nerve Ending
 Starry, Starry Night
Monday, April 21, 2008
Sasshole Kickball Jerseys
Materials Needed:
- Stencil Design
- Printer (Not Necessary)
- Freezer Paper
- T-Shirt
- Fabric Paint
- Exacto Knife
- Iron
- If you've designed your stencil on a computer, you can try to print the image directly on a piece freezer, shiny side down, cut to 8.5 x 11. I was unable to get the freezer paper to feed through a printer, so I printed it on regular paper and traced the design on to the freezer paper.

- Next, cut out your stencil using an exacto knife over a cutting mat.

- Then iron your stencil on to the t-shirt. Make sure the shirt has been washed and is wrinkle free beforehand. Make sure your iron is set to the dry setting, go over the stencil once and wait for it to cool. Once it's cooled, go over it a second time and make sure all of your corners and edges are ironed down. Then iron a blank second piece of freezer paper on the opposite inside of the t-shirt to prevent bleed through when actually printing.

- Next you'll actually paint your shirt. Fabric paint can be found, but I used acrylic paint mixed with a fabric medium. Ideally, I would think you'd rather dab the paint on with a sponge. I used a roller and it seemed to bleed quite a bit. Make your first coat fairly thin and wait for it to dry. Once it's dried you can paint on additional layers until you feel you have enough.
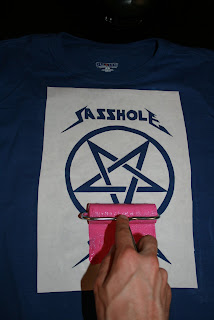
- When you're done painting, carefully peel off the freezer paper. Lastly, you'll need to dry the t-shirt, inside out on low heat in order to heat set the paint.


Monday, March 17, 2008
Super Fox Logos
Just in case we ever learn how to play instruments and start our band, Super Fox, these will serve as our album cover. Until then, they make fancy myspace profile pictures...

before after
after
 before
 after
after
 after
after before
 after
after
Subscribe to:
Posts (Atom)


